,
The Dark Decay Assay Manual How to do it and what not to do
by Dr J Floor Anthoni
www.seafriends.org.nz/dda/manual.htm
This chapter instructs you how to do the DDA
test and how to prevent common mistakes. Because you are now doing science,
you must adopt precise habits and constantly be aware of possible mistakes.
The DDA is by scientific standards a very simple test, which junior college
students should be able to do successfully. Read this manual carefully
and keep it with your test set for easy reference. Be aware that this chapter
on Internet is updated from time to time as new developments come to hand.
A short introduction to the DDA method. For a more complete introduction,
please read the DDA index page which also has a
dictionary of strange and new words.
Although it looks unassuming, the pH meter is a technological achievement
of precision that needs to be cared for and calibrated often. Your results
depend on it entirely. See also the document ph.htm
explaining more.
Scientists have access to a large assortment of containers to be used
as vials but we took vials that are readily available from your photographer:
film cans.
A 50m long non-stretching measuring tape as used by surveyors, enables
you to measure the visibility of the water you are testing. Here are some
tips and tricks.
When measurements are done at a constant temperature, they can be compared
whether taken by different people, at different times or places. Your travel
incubator is a special instrument.
ph.htm: explaining what a pH meter is
and how it works (3 pages)
.
For suggestions and comments, please e-mail
the author, Floor Anthoni
-- seafriends home -- DDA
index -- site map -- Rev 20050530,20050630,20050903,20051008,
Introduction While searching to explain the degradation occurring in the sea, Dr
Floor Anthoni discovered that the planktonic decomposers had been overlooked
as a most important missing ecological factor (limiting factor). That enabled
him to discover a method to measure not only the activity of the decomposers
but also the total decomposable biomass, which could consist of plant plankton,
animal plankton, bacteria and other biological material such as raw sewage
and undefined dissolved organic matter (DOM). It is important to understand
that the Dark Decay Assay (DDA) is not able to tell these apart.
The DDA is indeed quite simple in principle: take a water sample in
a bottle or jar. Shake it so that it becomes evenly mixed. Pour it through
a coars sieve (strainer) into containers (vials) that can be sealed, and
fill these as full as is possible. Screw or press the lids back on and
store the vials in a perfectly dark place at a constant temperature. About
once a day, open each container and measure its acidity (pH) using an accurate
three-digit pH meter. Plot the results on graph paper or on computer. After
one week at elevated temperature which accelerates the decomposition, all
biological matter has been decomposed. Wait another week to be sure.
What happens inside the vials? Because plants cannot survive in the
dark, the plant plankton immediately stops working and eventually dies,
which happens surprisingly quickly, already after two days in the dark.
The decomposers which consist of single-celled bacteria, fungi and viruses,
will decompose the plant plankton and eventually also one another. Because
they break apart the biochemicals of life which consist of carbon chains
with many hydrogen bonds, hydrogen ions (H+) are returned to the water
which makes the water more acidic. Because the lids are air tight, these
hydrogen ions cannot escape in the form of gases, and they are measured
by the pH meter. Thus the pH is an indication of the amount of biomass
decomposed, and this can be plotted as curves on a graph.
The decomposition happens more quickly at higher temperatures, which
means that the shapes of the curves depend on temperature. If it gets colder,
the curve flattens. If it becomes warmer, the curve steepens. So it is
important to stabilise the temperature for the following reasons:
curves taken one day in one place can be compared with those taken on other
days in other places.
measurements such as the bacterial Rate of Attack can be read from the
shapes of the curves.
by elevating the temperature (making it warmer), decomposition happens
more quickly and this saves time.
A constant temperature is maintained in an incubator which is an
insulated box maintaining a constant temperature inside. Often laboratory
incubators are quite wieldy as they maintain a water bath at constant temperature.
In these the vials are kept. Our portable incubator consists of a modified
Peltier-effect
car refrigerator which has been equipped with a mechanical thermostat and
an emergency battery. A small refrigerator designed for a six-pack of beer,
can keep two trays of 24 vials each at a constant temperature, which is
sufficient for most field work. The emergency battery protects the experiment
from power cuts and enables you to leave the car for shopping, etc. You
can make an incubator yourself following the instructions in the document
gear.htm
but if you wish us to make you one, order one through the registration
page
register.htm.
Even though the incubator stabilises temperature, frequent vigilance is
needed (see chapter below)
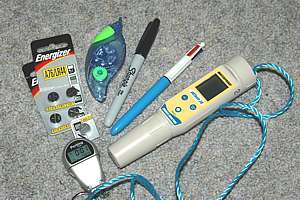
Your
minimum DDA laboratory set contains the following items:
a precision 3-digit pH meter which is battery-operated and portable
vials containing calibration buffers for 4.01, 7.00 and 10.01 pH
spare button cell batteries, 4 at a time
two collar lids with holes for the pH probe.
a simple incubator which comes with a mains voltage converter, cigarette-lighter
cable and battery clamps
two aluminium trays with 48 vials
a precise digital thermometer to monitor the incubator's temparature
a dark beaker in which the measurement is done, shielded from the surrounding
light
a digital timer with spare battery
data cards for writing the measurements on to
plotting cards for plotting the curves
a 4-colour ballpen and white-out tape for erasing errors and a black marker
pen
topographical maps of your area to read co-ordinates from
a calculator with LOG and ANTILOG function
a copy of the DDA manual
An extended set could in addition contain the following items:
a 50 metre measuring tape, rust-proofed, complete with sinker to measure
visibility with.
a salinity meter also capable of measuring temperature, needed when working
in brackish water of estuaries.
a portable battery-powered GPS for recording actual position, needed when
working on large lakes or the sea where position cannot easily be determined
from a topographical map or chart.
The DDA method works only if all vials are kept in the dark at all
times. The incubator should therefore always be securely closed as it also
functions as a dark box. But when samples are measured, they are also exposed
to the light, which is to be minimised:
Don't test in very bright surroundings like in bright daylight.
Don't remove samples from the incubator until ready for testing.
Once the pH probe has been inserted, place the sample in a dark beaker
One of the problems with the DDA is that the vials need to be opened in
order to be measured. That allows hydrogen ions to escape, which makes
the method less precise. Thus minimising 'unauthorised' escape of hydrogen
ions should always be a priority:
fill each container as full as is possible but a small bubble is unavoidable.
don't waste liquid while measuring, but some is spilled when shaking the
pH probe.
keep measuring times as short as possible to just allow the meter to settle.
Only at a few instances is precision (longer settling time) required:
at the very beginning, the initial pH, day zero.
about 48 hours later, where the Rate of Attack is measured at day 2.
at the very end, after 1 and 2 weeks, on days 9 and 13 when total biodensity
is measured.
screw or press the lids back on tight and verify this.
minimise the number of measurements by following the recommended time schedule.
remember that after a few days when the hydrogen ions have accrued (and
the pH has dropped), they are more keen to escape (due to a high partial
pressure inside the liquid).
group your tests for similarity as the pH meter then settles faster. Do
not alternate salt and fresh water samples for instance.
Note that the largest escape path of hydrogen ions (through their gases)
is through the air bubble above the sample. This happens slowly, until
the gases above and inside the liquid are in equilibrium (balance). When
the vial is opened, the bubble escapes, and with it all the gases inside
it. While doing the measurement, some gases escape from the liquid, but
this goes rather slowly, because most measurements are done in 1-2 minutes
(7-10 minutes for fresh water!) compared with a 24 hour or longer waiting
period in between. Thus it is important to keep the air bubble small.
As part of the measuring routine, it pays to shake each container a
few times in order to stir its contents, but we have not been able to demonstrate
that this actually matters.
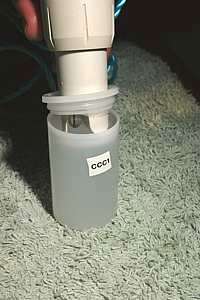
The photo shows the collar lid pushed around the pH probe,
just before it is pressed home onto the vial for measuring. The collar
has a dip that allows the liquid to rise up and outside the vial without
spilling it.
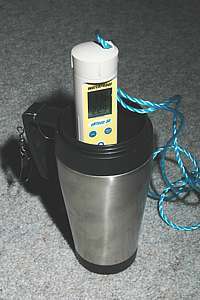
The measurement takes place in a dark beaker, in this case
a thermos coffee mug which could also be used to scoop a sample from the
sea (or to drink hot coffee with).
Although the water looks clearer than drinking water (which it is most
times) you may forget that inside lives an ecosystem containing millions
of individuals of thousands of species. It is a true mini world to such
an extent that each vial decomposes in a different way compared to every
other vial. Thus even when samples are taken from a well mixed jar, differences
between them will develop. So it is a good idea to take more than one sample
from an evenly mixed jar. For non-scientific work about two samples are
adequate, but for more precision and to satisfy scientific criticism, more
samples are required from a jar taken at one place at a given moment in
time. This of course can easily double the work later. One can often limit
the number of duplicates when a batch consists of mostly similar samples
taken from similar bodies of water, following a coastline for instance.
Having many vials with many different microbes inside them, raises the
possibility of cross-contamination. In its worst case, you will end up
with each vial containing the same stuff as all the others. Thus minimising
cross-contamination should also be a priority. Ideally one would like to
sterilise the pH probe each time before inserting it into the next vial
but this raises other problems. Fortunately for us, our samples behave
more or less like fully populated communities where introduced strangers
are not noticeable and cannot multiply unless there is vacant space available.
Thus cross-contamination is fortunately not very serious.
But there's more to it. Where we measure the Rate of Attack in the first
48 hours, cross-contamination is still so minimal that it does not play
a role. The beginning of each decay curve is truly due to the decomposers
already in the sample and to those that are already numerous. What happens
later, is less important. But we noticed that complete decomposition
is often not happening unless a small amount of cross-contamination has
occurred. It seems as if all the bacterium species necessary to decompose
other bacteria, must somehow be present and if not, must be introduced
in very small numbers.
To minimise cross-contamination, always proceed as follows:
shake the probe and collar lid thoroughly before inserting it in a sample
from a different place and time. The proper shake happens from the wrist
in a lashing movement while holding the pH meter by its far (dry) end.
Several shakes are necessary. Make sure never to hit the probe to an object
because it is a very sensitive instrument and a replacement probe is rather
expensive and takes a long time to become stable.
do the samples in the order of most similarity. Thus it is not a good idea
to switch between estuarine and open sea samples and back again. Do all
estuarine samples together. Likewise group freshwater samples together,
and so on.
In order to be successful, you must commit yourself to your experiment
such that the measurements are done timely and accurately, a spying eye
is kept on things that could possibly go wrong, and things are kept tidy.
One of the most important tidiness should be the way in which you record
your results. Write clearly such that there can never be doubt about the
figures. In case of mistakes, use a typist's white-out method so that in
the end, the data cards look tidy and anyone can clearly read and transcribe
them. Remember these cards carry the results of all your work. Make it
a good habit to do backups now and then by photocopying all cards that
are ready.
All items used have a name like A1, A2, B1 or ALPHA, BRAVO and so on.
Where more than one pH meter is used, they also have unique names or numbers.
All this is necessary in order to be able to identify the sets used, without
confusion so that irregularities can be tracked down. For instance, a certain
vial may always be out of line, possibly caused by a crack in the material.
This can be tracked back because all results have been labelled.
Once an experiment has completed its course, the data must be plotted
to make sense. Plotting cards are provided and a four-colour ballpen. This
will need some experience.
The pH meter Although the portable battery-operated three-digit pH meter looks unimpressive,
it is nonetheless a technological achievement of high precision. Your results
depend on it entirely, so it needs to be looked after and recalibrated
often.
A pH meter measures the voltage difference between a glass bulb with internal
electrode, and an external electrode. It also has a thermometer to make
automatic temperature corrections. Its output is in pH units which traditionally
run from 0 to 13 with 7 in the middle. A pH of 7.00 corresponds to neutral
water. A pH lower than that corresponds with acidic liquids, and above
it with basic or alkaline liquids. The scale is logarithmic and upside-down,
such that a liquid of pH=6 has ten times the number of free hydrogen ions
than that of a pH=7. A pH=5 has hundred times more, and so on. The sea
has a natural pH of 8.1 but lakes may differ considerably because they
are not interconnected. For more about pH meters, read the chapter about
it (ph.htm).
Although a new pH meter is delivered completely dry, it is not advisable
to let your pH meter's electrodes dry up. It would eventually build a crust
of minerals that could affect its precision. A new pH meter must be soaked
first in a saline solution, for which a vial of potassium chloride (KCl)
is provided. After an hour the pH meter can be calibrated. How this is
done precisely, is found in the meter's manual. But it goes in principle
like this:
You have been provided buffer solutions with known acidity or alkalinity:
pH=4.01, 7.00 and 10.01. Chemical buffers have the property that their
pH values are not easily disturbed by contamination, but we will attempt
to minimise this. Your pH meter assumes that when it is presented a solution
close to pH=4, and the calibration button is pressed, that the solution
is exactly pH=4.01, and it will make an internal adjustment accordingly.
Begin with pH=4 because it has the most hydrogen ions.
Rinse the pH probe with tap water, shake it dry and present the pH=7.00
solution. Once the reading has stabilised, which can take ten minutes,
press the necessary buttons to calibrate. Finally the pH=10.01 solution
is done.
Because our measurements range from pH=6.2 to 8.2, the middle value
pH=7.00 is very important whereas the furthest away, pH=4.0 and pH=10 are
least important. Thus the pH=7.00 calibration is done most often and with
most accuracy. That is why you keep three vials with pH=7.00 buffers. One
is labelled FIRST to take any contamination first. The other is least contaminated
and most precise. Then there is also a spare just in case. You can get
new pH buffers from a friendly laboratory or from a laboratory supplier.
They recommend that buffers be replaced every year, as they have an expiry
date. You can extend the life of buffers by storing them in a dark, cool
place.
When a pH meter is new, it drifts so much that it needs to be recalibrated
at least twice daily. After a few days it becomes more stable and after
a few months it may need calibration twice weekly. Make a note of the old
pH=7 values before pressing the calibration buttons. When a pH probe is
faulty, it can be replaced without replacing the body holding the electronics.
Every time a probe is recalibrated, it is registered in your calibration
log. This allows you to detect problems at an early stage.
.
Vials Scientists have access to a large assortment of containers to be used
as vials but we took vials that are readily available from your photographer:
HDPE (high density poly ethylene) film cans. These HDPE cans protect the
sensitive photographic emulsion from dust and moisture, so they should
also be air tight. Unfortunately this is not securely the case for most
brands, and we tested the FUJI film canisters with transparent bodies and
transparent or black lids as the best choice. Their lids push down INSIDE
the container into a polished groove. Test the lid's fit for each container,
by rotating it.
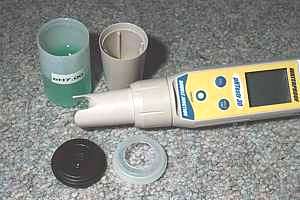
The
lids of these canisters are shaped such that a bubble can be formed right
in the top of the lid, allowing the lid to be pressed close. With a cork-borer
tool, a hole can be cut in a lid such that the pH probe fits securely in
the hole of the collar, and then onto the vial. It fits sufficiently neatly
that the container can safely be lifted with the probe. The probe needs
to protrude only a little, as the liquid pushes up around it on the outside
of the collar. This kind of lid allows for the smallest possible bubble
in the container, as well as for the smallest amount of liquid lost to
measuring.
In this photo the green liquid is the calibration buffer of pH=7.00.
The probe's cap is also shown but not visible is a small moist sponge deep
down.
Upon completion of each test, the vials are soaked and rinsed in clean
tap water or sea water. Note that sea water is less effective as it is
less solvent than fresh water, but it has no chlorine bleach which could
affect your results. It would be preferable to sterilise the canisters
with ultraviolet light, but letting them drip-dry upside down, then placed
on tissue paper, drying in bright sunlight achieves enough. Remember that
a small amount of contamination appears to be necessary to achieve complete
decomposition.
Do not use soap or other detergents, or bleach or any chemical, as
this may upset the next test(s).
Using other containers? We have tested many types of container, small
and large and came across some inexplicable differences. For some reason
the plankton ecosystem is easily inhibited by PVC containers and even glass!
So don't be dishearted if you don't get any results with different containers.
First work with the FUJI HDPE film can before trying others.
Measuring tape A long measuring tape is needed for research that relates biodensity
and rate of attack to underwater visibility. The idea behind it is that
plant plankton must absorb light in order to photosynthesise. Thus it obscures
light and is therefore visible. The more light is absorbed, the more chlorophyll
is present, and there should be a close relationship. The theory behind
this and practical results are explained in the chapter about the DDA
method. Here we concern ourselves only with how to measure underwater
visibility accurately.
Note that underwater visibility has a large range, from 0.05m (5cm) in
some lakes and estuaries to 50m in a blue sea. The measuring tape should
thus not be shorter than 50m but for visibility ranging from 0.05 to 2m
a long pole with calibration marks would be more suitable. It is also the
preferred method where currents run.
In the scientific literature the Secchi disc method is described
and used. This is a 20cm flat disc with 2 opposite quarters painted white
and two black. It is lowered in a horizontal position off the measuring
tape. Where the black and white pattern disappears, the depth is read from
the tape. This method has several problems.
the disc sinks only slowly as it flutters downward like a falling leaf.
When being pulled up, it offers high resistance and is difficult to reel
in. It does not have a hydrodynamic shape.
when employing the disc from a boat, one finds that the boat drifts so
much that the tape does not go down in a straight line but in a curve,
seriously affecting precision of measurement.
the disc has a fixed size of 20cm which is right for shallow waters from
6 to 15m but it is too small for deeper deployment and too large for more
shallow measurements.
the measurement depends largely on surface and weather conditions. In a
calm sea with a blue sky and bright sunlight, one can see the disc deepest.
But on an overcast day in rough conditions the disc is quickly lost out
of sight.
We found that a simplified method worked just as well. Just tie a white
shopping bag to the end of the tape. Cut the bottom out of the bag so that
it does not catch water or air. Shorten the bag as needed by tying a knot
in it for shallow deployment. By jigging the tape, the bag flashes as it
flaps up and down the tape's shackle. A 0.2kg weight (a sinker) is ample
to shoot the empty bag down quickly, while also making it easy to reel
in.
The most accurate measurements are done by floating in the sea in a
wetsuit and observing the bag through a dark dive mask, for the following
reasons:
by floating in the sea, one does not drift like a boat in the wind and
the sinker descends straight down.
a dark dive mask removes the reflection of the water's surface so that
the same accuracy is obtained in rough and calm seas, blue and overcast
skies.
the tape can easily be read without making adjustments for the height from
the railing to the water.
However, this method does not suit all conditions and people. Fortunately
the graph in which visibility is plotted against biodensity, is rather
coarse, with visibility plotted logarithmically. The biomass measurements
also have uncertainty. All this means that visibility must be measured
only reasonably accurately (to within 10%) and that any serious effort
is much better than an estimate.
When measuring inside estuaries where currents run, a long pole with
a white object attached to its end is more suitable. See the chapter on
equipment
for suggestions.
The incubator The incubator is of critical importance to the DDA. One can modify
a portable car refrigerator for this purpose as described in the chapter
on equipment. Here
we concern ourselves with how to use it. The travel incubator is a car
refrigerator with the following alterations:
a mechanical thermostat has been fitted to regulate temperature. Its bulb
(sensor) makes thermal contact with the metal inner box such that it reacts
swiftly. As a result, the mechanism switches on and off more frequently
than strictly necessary.
inside the box, making contact with the element, a heat absorbing freezer
pack is placed to even out temperature fluctuations.
an emergency rechargeable battery of 1.3Ah has been placed inside the mechanism.
This battery is inadequate for continuous operation as it would only last
for 15 minutes at full power. But it protects against power failures and
it keeps the incubator running while disconnected, such as for measuring
and leaving the car.
a precision digital thermometer with external sensor reaches down into
the box, making internal temperature visible outside.
inside the box two aluminium trays are placed, each holding 24 vials.
the box closes tightly so that it also functions as a dark box.
One needs to keep a watchful eye on internal temperature as it is so easy
to kick the thermostat out of adjustment, forget to plug the incubator
onto mains power and so on. A temperature hiccup in the first two days
can spoil the rate of attack measurements. Leaving the lid ajar can spoil
the whole experiment as it exposes the vials to light. Take care of the
following:
place the digital thermometer probe between trays inside the incubator
frequently monitor the displayed temperature because it varies somewhat
when the outside temperature changes drastically.
you will notice that the temperature is not constant, but swings between
extremes of about 1.5 degrees up or down. Make sure the average temperature
is as desired (e.g. 27ºC)
swap the trays daily such that the top tray becomes the bottom one and
vice versa.
make sure that the incubator is connected to an external power source because
its internal battery soon runs out.
when you have reached the ideal setting, tape the dial over with wide duct-tape
so it cannot be altered accidentally. This is particularly important when
travelling in cars and boats. Note that any irregularity in temperature
may void your whole experiment!
Time schedule Keeping to a standardised time schedule is of critical importance because:
the DDA measures the accumulation of hydrogen ions which are easily leaked
away, affecting the accuracy of the method. However, the most important
use of the DDA is in comparative studies where one time and place is compared
with another. So even if not 100% ideal, its most important aim can be
met by standardising how it is done.
to minimise ion escape, the number of measurements is minimised, and this
minimises also the amount of work.
in the beginning, the sample still behaves very much as if it were in
situ (in its natural place) but as hydrogen ions accrue and oxygen
is used up, it becomes rather artificial and its main purpose is now to
decompose all biomatter completely, including the bacteria themselves.
The very first four measurements must therefore be done accurately. Note
that the pressure for ions to escape is then still minimal.
On day 1 two measurements are done, as if the first three were spaced 12
hours apart. This is needed to capture the powerplankton which shows
a flat shoulder followed by a steep decline after 36 hours.
On days 3 - 5 the measurements need little accuracy as they change rapidly.
One would say that measurement is not required, but the DDA has shown to
proceed better, perhaps due to a small amount of contamination needed.
After the measurement on day 5, three drops of 20% alcohol (one drop per
10ml) are added to the second set, in order to provide the bacteria with
the missing energy lost to biochemical conversions. Note that the added
alcohol does not speed up the decay but helps it across a threshold.
The temperature was chosen such that the whole experiment finishes on day
9 when an accurate measurement is done. Day 13 is just there to check.
Sometimes the pH begins to increase, a sign that hydrogen ions are being
lost. The experiment finishes just in time before the next one in a fortnightly
cycle.
Because the addition of alcohol measures a different property of the plankton,
a separate set can be assigned but it does not require extensive measuring.
Day 0 09:00-18:00
day of collection
measure
Day 1 08:00
early
measure
Day 1 20:00
late
measure
Day 2 20:00
±24h later
measure
Day 3 20:00
±24h later
measure
Day 5 20:00
measure
Day 9 any time
measure accurately
Day 12-13 any time
measure accurately
open vials
Day 19 measure accurately
natural pH
set for alcohol enhancement
measure
add alcohol
measure
accurately
open vials
measure accurately
natural pH(*)
(*) alcohol affects natural pH readings.
Use for comparison only.
Please note that improvements to the DDA technique are made from time
to time and that this time schedule may change accordingly. Check this
page from time to time.
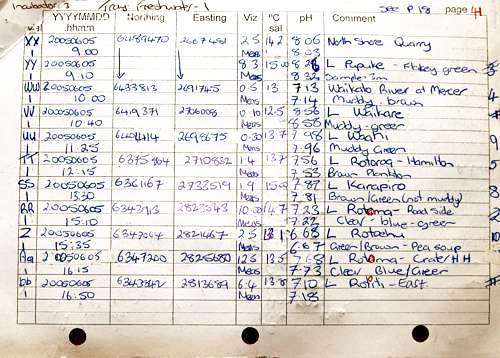
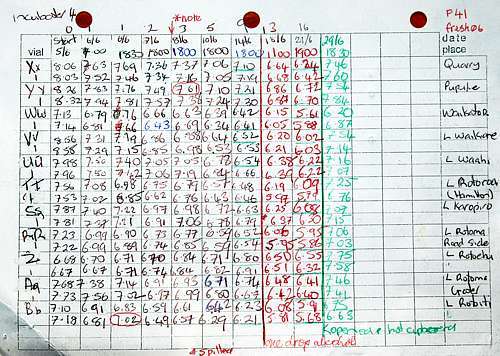
Here is what a DDA card could look like on front and reverse side:
Calculations The DDA method has introduced the hion as a new unit for biodensity
to facilitate comparisons. During decomposition, hydrogen ions are freed
and many of these become hydrogen ions in solution, which are measured
with a pH meter. The DDA method is based on the assumption that these hydrogen
ions are a proxy for biomass although how the two relate EXACTLY, has not
been ascertained. This chapter shows you how to calculate hion biodensity
from the differences in pH.
The hion as unit of biodensity assumes that for most practical
situations, the pH does not rise above 9.0, and if it does, the number
of hions involved are so small (less than one) that they can be neglected,
but fractions of a hion are still technically possible, even if they are
not measurable with a three-digit pH meter.
The biodensity decomposed is calculated by subtracting the beginning
value from the ending value, with proper ANTILOG (ALOG) conversion. It
is not necessary to understand logarithms to do this correctly. Here is
the formula where fpH= final pH and ipH= initial pH:
biodensity (hion) = ALOG( - fpH) - ALOG ( -ipH) in parts per
billion (10^-9)
So if the biodensity on the calculator reads 2.34 x 10^-7 it means 23.4
x 10^-8 or 234 x 10^-9 or 234 hion
On your calculator, use the memory function to store the initial value
and press the following buttons:
type this
press this
what happens
8.06
+/-
the initial pH is negated to -8.06 which is what pH really stands for
ALOG
you may need to press two buttons like SHIFT and LOG to achieve this:
8.7096^-09
Min
store into memory. Some calculators use STO ore something.
6.88
+/-
enter final pH and negate it: -6.88
ALOG
anti-log it so the calculator reads: 1.3183^-07
- Mr =
subtract what is stored in memory and press the = button for the result:
1.2312^-07
which means 123^-09 or 123 hion
Washing Before using the vials for testing, and after completion of each test,
vials must be washed and dried. It is really very simple. Ideally one would
want to sterilise them but this is not easily done without introducing
new problems. Remember that each sample will contain a living ecosystem
with thousands of species and millions of individuals. Remember also that
the plankton ecosystem is easily inhibited by chemicals such as fluoride
and chlorine from tap water and various kinds of soap.
If you are able to collect rain water from your roof, this is a real
asset. If you have access to distilled water, it comes in handy. But you
can achieve satisfactory results by simply rinsing the vials in warm tap
water. Don't get tempted to use soap but wash your hands with soap first
because a smudge of skin grease on the inside of a vial can upset measurements.
The rule for washing or rinsing is successive dilution. If your
first wash is effective only by 90%, leaving 10% 'dirt', the next wash
will leave 10% of 10% or 1%, and the next one after that 0.1% 'dirt'. So
the secret is to wash at least twice.
The third wash can be done with distilled water but this is not strictly
necessary. It is more important to dry the containers completely such that
pollutants like chlorine and fluoride evaporate. Shake the moisture off
and place containers on a towel in the sunlight before a window. This provides
enough ultraviolet light to reach the cleanliness desired for the next
test. Once the containers and their caps are dry, cap them and store them
away in the dark.
Diluting alcohol The ethyl alcohol solution used is diluted to a standard strength of
20% for the following reasons:
the solution becomes safer to handle
the quantity needed becomes more accurate to administer
the solution's strength is high enough to prevent it from oxidising and
acidifying
the alcohol does not evaporate easily
However, the dipenser needs to seal perfectly for the solution to last.
Even so, discard it when there is less than 20% left in the dispenser.
From the local chemist you can purchase 90% pure ethyl alcohol (normal
alcohol) which needs to be diluted 4.5 times for 20% final strength. You
can do this with either a sight glass or with scales. You won't need more
than 50ml of it.
Fill the sight glass to 10ml with 90% alchohol, then add distilled
water to 45ml (35ml added). With nearly 30 drops per ml, this suffices
for 1350 drops or at most 450 samples. Make a new solution when less than
20% or 10ml remain in the dispenser.
 Your
minimum DDA laboratory set contains the following items:
Your
minimum DDA laboratory set contains the following items:
 The
lids of these canisters are shaped such that a bubble can be formed right
in the top of the lid, allowing the lid to be pressed close. With a cork-borer
tool, a hole can be cut in a lid such that the pH probe fits securely in
the hole of the collar, and then onto the vial. It fits sufficiently neatly
that the container can safely be lifted with the probe. The probe needs
to protrude only a little, as the liquid pushes up around it on the outside
of the collar. This kind of lid allows for the smallest possible bubble
in the container, as well as for the smallest amount of liquid lost to
measuring.
The
lids of these canisters are shaped such that a bubble can be formed right
in the top of the lid, allowing the lid to be pressed close. With a cork-borer
tool, a hole can be cut in a lid such that the pH probe fits securely in
the hole of the collar, and then onto the vial. It fits sufficiently neatly
that the container can safely be lifted with the probe. The probe needs
to protrude only a little, as the liquid pushes up around it on the outside
of the collar. This kind of lid allows for the smallest possible bubble
in the container, as well as for the smallest amount of liquid lost to
measuring.