Principles, techniques, skills
by J Floor Anthoni (2005)
www.seafriends.org.nz/phgraph/macro.htm
Due to the nature of light under water, the
underwater photographer works mainly close to his subject, plagued by stringent
compromises between available light, film speed and depth of field. It
is often said that macro photography because of its simple setup under
maximal strobe light, is the easiest and most successful technique for
beginners. But there are problems. This chapter aims to give you a full
understanding of the techniques of close-up (macro) photography.
Underwater photography is most successful when close to the subject
but where does portrait photography become macro photography? An introduction
with historical notes.
Macro photography needs a lot of light and your lighting setup must
be flexible to deliver it correctly. How to recognise problems and how
to fix these.
introduction There is no precise definition of where portrait photography ends and
macro photography begins. Macro is the Greek word for large, and it is
used for making subjects appear large. A practical way for defining macro
photography is by the strength of the lens, or how nearby it can focus.
In the old days, a minimum distance of one metre (one diopter) was considered
enough, but most lenses will now go to 0.5 metre (2 diopter). Portrait
photography ends at about one metre using a 100mm lens. If you want to
go any closer, the lens must be mounted further from the camera by means
of bellows or extension tubes. One can also make the lens stronger by placing
closeup lenses of 1-4 diopters in front.
Modern zoom lenses and digital cameras can focus subjects very close
to the lens and this has brought macro photography into the hands of many.
The Nikonos RS 50mm macro lens was a technical feat for its time, being
able to auto-focus down to 16.7cm (6 diopter range). Such lenses are formidable
work-horses as they give such a wide range of enlargement.
One could also define macro photography as where mixed light photography
ends and maximum strobe light begins.
Beginning underwater photographers often enter the arena with severely
limited camera equipment and this is still very much the case today, even
with digital cameras in underwater housings. The salesman never tells them
what the camera won't do and what its limitations are under water.
One of the problems found with cameras with separate viewfinders or
sportfinders is that of parallax. An obstacle could protrude in the line
of sight without the photographer noticing, but this is but the least serious
of problems.
Surely the biggest problems plaguing the underwater photographer is
that the strobe light is difficult to control. It so happens that the intensity
of the light diminishes quadratically with distance, which creates high
uncertainty. So by taking photos at a fixed distance, with a fixed intensity
of light is one of the ways to increase success. This makes fixed-distance
macro photography an easy start for beginners, yielding colourful pictures
that can be entered into competitions.
The arrival of the Nikonos IV and V who were able not only to meter
ambient light, but also to control the strobe, was a major leap forward
even though the more thoughtful photographer used self-controlled thyristor
strobes before that. It was now possible to attain even lighting with variable
distances, and this greatly enhanced the chance of success. However, these
cameras were still not able to focus automatically such that most evenly
lit photographs were usually out of focus.
Understandably, non-amphibic reflex cameras with automatic focusing,
TTL (Through The Lens) light metering and strobe control, housed in separate
underwater housings became popular. Their only disadvantages were often
clumsily placed controls, an excessively large housing (to accommodate
several brands), and optics not correcting for the water interface. But
very good photos could be taken with them.
The Nikonos RS (Reflex System) came out in the beginning 1990s but was
taken off the market in 1996, even though it remains today the most sophisticated
underwater camera system ever made, delivering also the sharpest images
with the most comfortable controls. It is truly a formidable work-horse.
It is clear that macro photography is done in many ways, using the various
camera systems, but underlying it all is the theory of lenses, depth of
field and the limitations imposed on lighting systems. With this general
knowledge, we hope you will be able to improve your chances of success.
theory In the chapter on film and lens we have introduced
the concepts of optics, focal distance and the various types of lenses,
and here we will build further on this knowledge. Let's first get back
to the basics of optical theory.
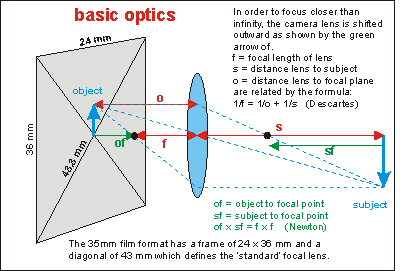
The
drawing shown here captures the basic law of optics defining where an image
is focused. On the right the subject with distance s to the lens.
On the left the focal plane with distance o to the lens which is
made up of a shift of and focal length f of the lens. The
drawn dashed paths of light are special cases:
all light parallel with the optical axis pass through the lens and focus
in its focal spot f inside the camera. This also works in reverse
and light exiting the lens in parallel with the optical axis will have
come from a symmetrical spot f outside the lens.
all light rays going through the middle of the lens are not refracted (bent)
and pass straight through.
In this manner one can construct in a graphical way the basic law of optics:
1
/ f = 1 / o + 1 / s (discovered by Descartes)
The physicist Newton formulated the basic optics law noticing that the
distance from focal plane to focus (of) is inversely related to the distance
from subject to the equivalent focus outside: of x sf
= f x f With Newton's formula one can quickly calculate how far to move the
focal plane to focus on a distant object.
Note! The standard lens
is defined as the diagonal of the frame. In the case of 35mm film, this
is 43.3 mm, reason why both the 50mm and the 35mm lens can be considered
standard. For a 60 x 60 mm medium format, the diagonal is 85mm and this
is indeed the standard lens for this format. The standard lens is considered
not to cause distortion of depth. A wide angle lens by comparison, creates
the impression of space by placing subjects seemingly further away. By
contrast, a telelens makes subjects seem nearby and closer together, thereby
seemingly stacking them.
From simple trigonometry, one can see that the magnification is given
by: m = o / s So the further the lens from the focal plane (o becomes larger
as s becomes smaller), the more magnification is achieved. Obviously
for a 1:1 magnification, o = s and this happens precisely
when d = f . A 35mm distance ring should thus achieve 1:1
magnification for a 35mm lens.
One may ask how many diopters a 35mm lens is. The diopter is defined
as one for a lens with focal distance of 1 meter. In general, the diopter
strength = 1 / f (in metres). Thus for a 35mm lens f =
0.035 and its diopter strength corresponds to 1/0.035=28.6. Likewise a
50mm lens is 20 diopters and a 100mm lens 10 diopters.
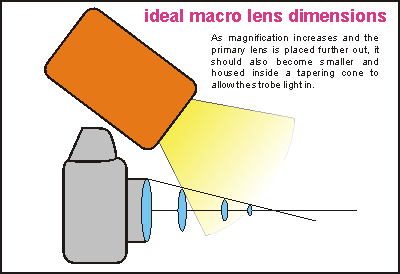
Thus the wide angle lenses are the strong lenses whereas telelenses
are weak. Strong lenses give bigger magnification as long as they are placed
close to the subject. For the highest of magnifications (as in a microscope)
one needs lenses with very short focal lengths, placed very close to the
subject. They also need to be very small in diameter. The latest technology
of multiple strand optical cables can indeed place the camera at a fly's
eye.
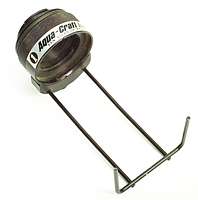
Extension
tubes The standard primary (not zoom) lens is extended outward by means of
extension tubes which are water tight. There is no standard for such extension
tubes, but they usually come in three sizes which can be combined, or one
size in combination with lenses of different focal lengths (e.g. 28, 35,
80mm). The picture shown here gives the general idea. It is a commercially
available extension tube for Nikonos III, IV, V cameras. The framer is
necessary because these cameras have inadequate focusing arrangements.
For this kind of bracket one must mount the strobe directly above the camera
to avoid one of the side poles casting a visible shadow. When the strobe
is placed towards above-left, the lefthand post needs to be sawn off.
The fixed distance extension tube works well, as scientists use it to document
nudibranchs and other small creatures. They often carry two Nikonos cameras
with extension tubes set for different enlargements. But one is never sure
where the camera focuses precisely. Furthermore, subjects often do not
tolerate a frame pushed onto them. So, on the one hand one wishes the frame
to precisely indicate the plane of focus, but on the other hand one wishes
to place the subject just outside the frame.
This can be done to some extent with the lens' internal focus ring
which runs from 0.8m to infinity (1.25 diopter). For a standard 35mm lens
of 28 diopters, this is but a small change of around 5% in distance. Depth
of field follows also along this logic: the larger the magnification, the
more critical depth of field becomes.
Close-up lenses For housed SLR (Single Lens Reflex) cameras, the obvious way to go
macro is by placing a close-up lens in front of the primary or zoom lens
inside the underwater housing. The following focal distances (in cm) above
water now apply:
1D
2D
3D
4D
5D
infinity
100
50
33
25
20
1.0m
50
33
25
20
17
0.9m
47
32
24
20
16
0.8m
44
31
24
19
16
0.7m
41
29
23
18
16
0.6m
38
27
21
18
15
To make your own table of focal distances, use the formula: diopter
= 1 / s - 1 / c where c is the camera adjustment from infinity
down to wherever, in metres. This translates to: 1 / s = diopter + 1
/ c For underwater distances, multiply by 1.33.
From this table a very clear picture emerges:
the camera's distance adjustment has the largest effect on the smallest
diopter
with a camera range from 0.5m to infinity and a 1 diopter in front, one
can take pictures from 33cm to 100cm.
when using a strong diopter, it makes no longer sense to use the camera
for focusing, and one needs to focus by moving the camera forward and backward.
a close-up lens takes long distance focusing away.
teleconverter A teleconverter is a special lens placed in between camera and camera
lens. It virtually extends the focal length of the lens, usually a primary
lens (not zoom). Thus a 2x teleconverter extends a 50mm primary macro lens
to a 100mm lens with the same properties such as focusing between infinity
and the nearest closeup distance. The result is a two times enlargement
as if one were truly using a 100mm lens.
The advantages of extending the focal length this way are:
it is a cheap way to keep using the expensive primary lenses you already
have
it creates extra space between the front of the lens and the subject, for
the strobe light to enter
But it may also have disadvantages:
it is another lens group, inviting for additional unsharpness
it may make the camera more clumsy
Note that modern lenses for SLR cameras have teleconverters and wide angle
converters in-built. A 13mm fish eye lens for instance presents to the
camera a standard lens. This is also done in 'short' telelenses.
Tip: although you
are shooting with the smallest apertures, depth of field in macro photography
is deceptively critical. In accordance, aiming the camera becomes very
critical too. Always identify where the plane of interest lies and aim
your camera so that it forms the focal plane.
Tip: a true macro
lens which focuses over a 4-6 diopter range is by far the preferred tool.
It needs a sharp teleconverter to extend its range.
Tip: with a good quality
50mm or 100mm macro lens one can take surprisingly sharp and good pictures
at distance (2-5m) successfully by using a wide aperture (f4-5.6) and placing
the strobe far out with a strong warming filter in front of it. At such
distance, most of the subject will be in focus. Because of the wide aperture,
scatter will be faint and in large overlapping patches, almost invisible.
The macro lens used at distance, allows you to get close enough to shy
fish.
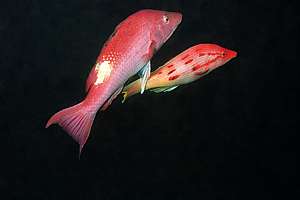
f034704: mating pigfish (Bodianus unimaculatus) at
dusk, showing their mating colours. Shown here is the uncropped image taken
with a 50mm macro lens at 2m distance f4, lit by strobe light with a colour
correction filter. The picture is sharp. The picture was composed to symbolise
how close the fish were to the surface.
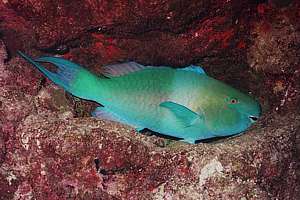
f047913: this large parrotfish (70cm) sleeping at night,
was taken with a 50mm macro lens from 2.5m distance at f4 and f5.6. The
same technique as described on left was used. Note how the fish has solidly
wedged itself in place. An interesting detail is that this shallow niche
faced the brunt of the waves head-on, but inside it should be tranquil.
How do they find these places?
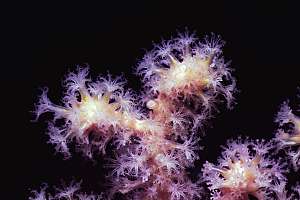
f041324: in this tight closeup of gorgonean polyps, one must
focus by moving the camera in and out, often with autofocus disabled. It
is important that all items of interest are in the same focal plane.
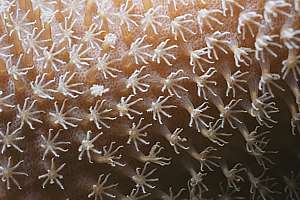
f046833: extreme closeups reveal a new level of interest
like these tiny 8-armed polyps on a fleshy coral. One can often take advantage
of side-lighting because there is too little room for frontal lighting.
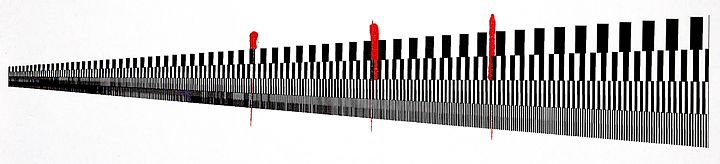
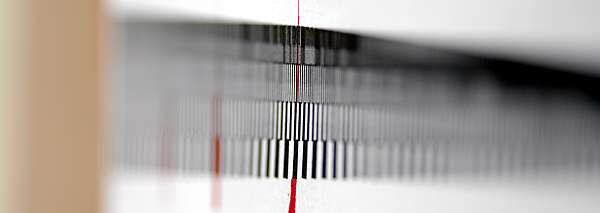
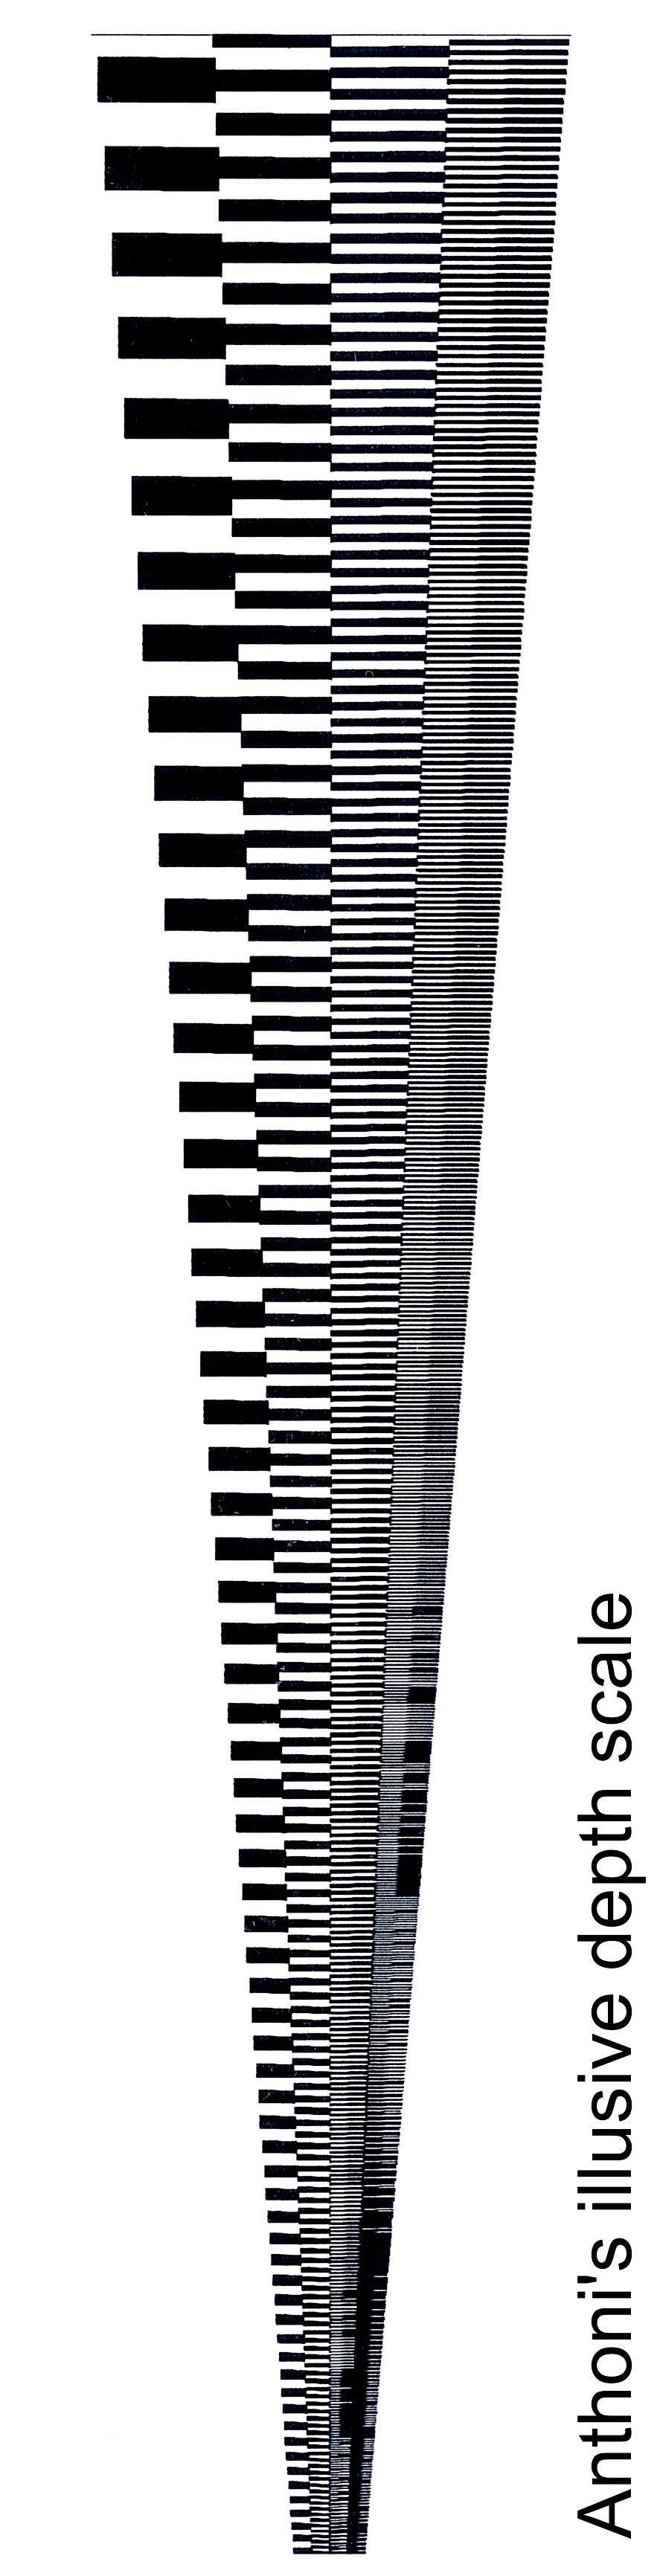
Illusive depth scale How can you check that where
you think or the camera thinks the focal plane is, is indeed where the
lens focuses? When working with 8mm lenses and even 5mm wide angle lenses
in Super8 cameras, this becomes very critical. One would think that this
is easy to check, but without very special instruments, it becomes nearly
impossible. One of the problems is that objects nearer by, become enlarged,
and thus appear sharper. To overcome this and other problems, I invented
the Anthoni optical illusion scale which you can print here
(250KB). It is made by a BASIC program of which you find the full description
here
as part of a chapter on calibrating your lens for unsharpness and depth
of field.
Essentially this scale has
a number of radiating lines that appear parallel. The markings on this
scale are such that they appear equally widely spaced over the entire range.
Having eliminated these two virtual sharpness effects, the point of focus
can now be read accurately. If you want to check whether infinity is indeed
in focus, place a 4 diopter closeup lens in front and focus the camera
on a point 25cm distant on the depth scale.
With this scale (a waterproof
version) you can now verify where your macro lenses focus underwater. It
is a very handy tool to have and entirely free. This is what it looks like,
with red markers at 15, 20, 25cm.
What the camera sees with
a wide aperture, enables you to establish the focal point precisely.
strobe
light One of the attractions of macro photography is that ambient light no
longer plays a role, simply because there is far too little to achieve
satisfactory depths of field and as one enlarges more, ever more light
is needed. So the strobe light is adjusted to match the smallest aperture
(f22-45) on the lens. As the magnification factor increases, one rapidly
needs more light according to the formula Light = ( magnification +
1 )2 (squared), as shown in the table below
magnification factor
1:2
1:1
2:1
3:1
lens to focal plane mm
52
70
105
140
extension ring thickness mm
17
35
70
105
lens to subject mm
105
70
53
47
extra light needed mm
2.25
4.0
9.0
16.0
For the situation under water, a factor 1.33 should be applied to the
lens to subject distances in above table.
Because
of the clumsy size of underwater housings and their ports, there is little
or inadequate room to let the strobe light in for near-frontal lighting.
As a result, very tight closeups have to make do with side lighting or
back lighting. Here is where some small digital cameras inside very compact
housings, have an advantage. Also the old Nikonos V with its small 35mm
primary lens, offers an advantage. Don't count this 'obsolete' camera out
yet, for large and sharp magnifications.
The message here is that you need to alleviate this problem by making adaptations
to the hardware. Use a small strobe and special brackets. In macro photography
with a macro lens, the strobe is constantly moved outward/inward, left
to middle to right, and is often taken off the bracket for side and back
lighting and for admitting light into narrow confines.
strobe distance Because the amount of light is at a premium, one would be tempted
to place the strobe as close as possible to the subject, but this results
in large differences in intensity between the nearest and furthest side,
and it also makes the background very dark. If one places the strobe too
far back, there could be an insufficient amount of light and it all appears
to come from a small spot, resulting in harsh lighting with harsh shadows.
The secret is to work with a small strobe, placed back sufficiently
to still appear large (some need a diffuser), while lighting nearest and
furthest point in the focal plane with the least difference. By pointing
the light a little too far to the opposing side, one uses the environment
as reflector to bring light in the shadows while also lighting less of
the near side. Understandably, when shooting at variable distances, this
compromise must be rearranged each time, resulting in constant adjustment
of the strobe. How easy you can do this, makes a large difference to your
chance of success.
The
diagram illustrates the effect of a small strobe or a strobe placed backward
too far. A small strobe behaves like a point source, creating harsh shapes
and shadows because the light cannot reach the sides. A large light source
as used to be common with bulb flashes, creates soft blending shadows and
gives objects that three-dimensional look. It also makes scatter less obvious.
The challenge is to create a large light source which can also be placed
nearby.
Note that in the drawing the subject is brought closer to the light
source to make the light source appear larger, but this of course exacerbates
uneven lighting between the near and the far side. What is needed is a
larger reflector while keeping the strobe away from the subject. Note that
in supermacro photography (linear enlargement larger than 1:1), the strobe
must be placed proportionally closer to the subject.
the position of the strobe in macrophotography
is critical and creative
f046627: this tropical whelk (5cm) was photographed with
a single strobe placed centrally above. Reflection from the environment
brings enough light to soften the shadows.
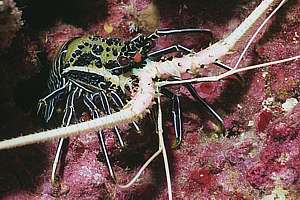
f046410: this painted crayfish was not easy to reach. A large
SB104 strobe casts light around legs and feelers, bringing some light there.
one or two strobes? When the light comes mainly or exclusively from one source, one ends
up with deep black shadows that are undesirable. So how can this be alleviated?
The immediate solution is to have two strobes, one set to full power and
the other to 1/3 or 1/4 power to fill in over the shadows. This has the
disadvantage that another strobe needs to be mounted where space is at
a premium. It can also make images look less natural. Furthermore, macro
photos are often taken in recesses where only small equipment can get to.
So let's review our options without a second strobe:
use the environment to reflect light into the shadows. Ironically, the
very large and powerful SB104 strobe, designed for wide angle photography,
blats so much light all around, that often enough comes back to fill the
shadows.
place the strobe back somewhat so that it produces more even lighting.
The strobe's position depends entirely on the size of the focal plane and
magnification.
place a diffuser in front of the strobe to make it appear bigger, preferably
also guiding some light to the other side. you must have sufficient flash
power to do this.
make sure your bracket allows you to change the position of the strobe
easily, particularly when you have an autofocus macro lens. You must have
a modelling light for this. See also the chapter on making your own equipment
and Anthoni's unique bracket system. In variable-distance macrophotography,
the strobe is constantly adjusted and moved inward and outward.
where ambient light is still available, place the strobe on the other side
and let sunlight fill the shadows. This is often possible because it can
be strong enough for minus three f-stops.
identify the plane in your subject because the strobe needs to light it
evenly.
when you hold a subject in your hand, move the strobe to the other side.
remember that macro photography is relatively easy, so it needs perfect
lighting for best results.
ring lighting In scientific and medical photographs one often uses a ring light to
minimise annoying reflections from wet tissues. The ring light is a long
strobe tube bent in a circle and mounted around the lens. One can tape
parts of the tube to accentuate light from one direction. Such a device
has not been available for under water. For a better solution, see aquarium
photography below.
modelling light A modelling light is a small torch mounted on or inside the strobe.
It allows one to judge whether the strobe has been aimed correctly and
whether the lightfall is optimal. It also provides the light necessary
for auto-focusing. It is an absolute must to have and enhances one's photography
considerably. Place it low on the strobe such that the strobe points a
little too high, thereby avoiding overexposure in the foreground.
Now that bright white LEDs (Light-Emitting Devices) are becoming more readily
available, the modelling light can become conveniently small, yet bright
enough for auto-focusing.
Tip: you must be able to
easily switch your modelling light off and on because in mixed light photography
it projects an unwanted spot. Also when zooplankton bugs are swarming in
front of the lens, switching it off gets rid of them temporarily.
sidelighting and backlighting Transparent subjects benefit greatly from sidelighting or backlighting
and macro lenses create great opportunities but a few problems must be
addressed:
sidelighting creates a black background against which scatter becomes eminently
visible. We must now use a light source with a narrow beam (often blinkered
or barn-doored) which can be pointed at the point of focus. You must have
a modelling light which points in the beam's direction. The camera must
be focused manually, on one's finger for instance. The subject is then
placed in the light beam where it is also in focus.
sidelighting is most successful with a small light source as a harsh effect
is desired.
it helps if your buddy shines on the subject at night, while you prepare
your approach
the same setup can be used in daylight. Make sure an unobstructed sea forms
the background.
have patience, because many adjustments must be made to get it right. When
taking photos in mid water, everything seems to work against you. The jellyfish
is moving, your bubbles affect it, your buoyancy is hard to control, as
is your distance to the subject and so on. Just take time.
With small subjects that are close to the lens, you will be able to hold
the detached strobe to the side and behind the subject, but invisible to
the camera. It is worth trying.
f036622: a densely set hydroid tree (Solanderia sp)
invited for back-lighting, which was done by the photographer, but a shrub
this size could better have been lit by the buddy, holding the strobe further
out.
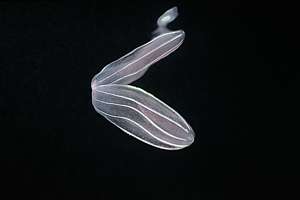
f046112: a comb jellyfish reflected by the water's surface.
This stark photo was taken with the sidelighting technique discussed above.
Tip: for backlighting you
need a long strobe cord that somehow is curled up when not used for backlighting.
Tip: you must be able to
detach your strobe easily.
aquarium Aquarium photography should be so easy because
one won't need to dive. It also allows one to stay warm and dry, while
still within macro-distance from subjects. But there are problems.
the glass must be clean and without scratches, which is obvious. The quality
of your photo depends on the weakest link.
reflections must be avoided, which can be done by moving the strobe very
close to the glass and out of view of the camera. Also camera angle matters
in relation to the position of the strobe.
one can employ complementary linear polarisers to exclude reflections (explained
below)
a powerful strobe must be used. Often underwater strobes provide more light.
The objective is to stop the lens right down to f22 or better.
an underwater strobe can be placed inside the aquarium, improving quality
considerably:
it gives a more interesting light angle
sidelighting and backlighting are now possible
it avoids reflections from the glass but it may upset the subject.
it provides for the shortest light path, thus retaining more of the red
component of the light.
the light passes through the window only once, thus halving an undesirable
colour cast
one can arrange the light direction such that the other windows become
invisible or less visible. Note that an aquarium window becomes a good
mirror from the inside looking out. A light placed high thus reflects on
the other sides, unless placed above the aquarium, but this gives an unnatural
light.
normal lenses, however expensive, do not correct for the air-water interface
and a Nikonos RS underwater camera gives best aquarium shots with its 50mm
macro lens.
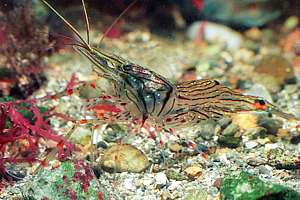
f032018: a 4cm transparent shrimp (Palaemon affinis)
photographed through aquarium glass with a Nikonos RS underwater camera
outside and a small strobe inside. This gives best results.
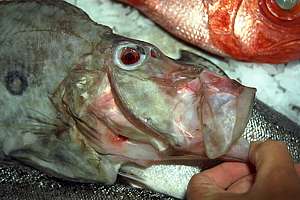
f016731: in the fish market we could demonstrate how John
dories can extend their mouths to catch fish. Two complementary polarisers
were used to eliminate glare. This technique is also suitable for medical
photography.
Complementary
polarisers Reflections can be eliminated
almost completely with two linear polarising filters rotated 90 degrees
between them. One is placed on the strobe and the other before the lens.
Although nearly two f-stops of light are lost, so are the reflections,
which makes this technique eminently suitable for rockpool, aquarium, scientific
and medical photography.
The idea behind it is that
reflected light has not interacted with substance and consists thus entirely
of the polarised light emitted by the strobe. Because the polariser in
front of the camera is turned by 90 degrees, it blocks this light, which
can be tested by sending test flashes and rotating the one on the camera
until all reflections disappear. Magical!
To make it work, buy a sheet
of polarising plastic and cut a rectangle to cover the strobe window. Sometimes
the glass from polarising sun glasses can do the trick. For the camera
just buy a linear polariser, which should be in your camera kit already.
The technique works equally
well under water to show deep colours on shiny fish, but the loss of two
f-stops is rather off-putting. Also fish glare a lot less underwater than
above.
A single polariser can also
be used in natural light fish photography, as the sunlight underwater is
polarised vertically by the water surface. To counteract reflections, turn
the polariser on the camera horizontally. Although it does give better
results, one loses nearly two f-stops and a high quality polariser that
stands corrosion from salt water is impossible to find.
 The
drawing shown here captures the basic law of optics defining where an image
is focused. On the right the subject with distance s to the lens.
On the left the focal plane with distance o to the lens which is
made up of a shift of and focal length f of the lens. The
drawn dashed paths of light are special cases:
The
drawing shown here captures the basic law of optics defining where an image
is focused. On the right the subject with distance s to the lens.
On the left the focal plane with distance o to the lens which is
made up of a shift of and focal length f of the lens. The
drawn dashed paths of light are special cases:
 Because
of the clumsy size of underwater housings and their ports, there is little
or inadequate room to let the strobe light in for near-frontal lighting.
As a result, very tight closeups have to make do with side lighting or
back lighting. Here is where some small digital cameras inside very compact
housings, have an advantage. Also the old Nikonos V with its small 35mm
primary lens, offers an advantage. Don't count this 'obsolete' camera out
yet, for large and sharp magnifications.
Because
of the clumsy size of underwater housings and their ports, there is little
or inadequate room to let the strobe light in for near-frontal lighting.
As a result, very tight closeups have to make do with side lighting or
back lighting. Here is where some small digital cameras inside very compact
housings, have an advantage. Also the old Nikonos V with its small 35mm
primary lens, offers an advantage. Don't count this 'obsolete' camera out
yet, for large and sharp magnifications.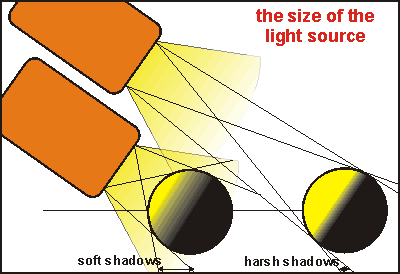 The
diagram illustrates the effect of a small strobe or a strobe placed backward
too far. A small strobe behaves like a point source, creating harsh shapes
and shadows because the light cannot reach the sides. A large light source
as used to be common with bulb flashes, creates soft blending shadows and
gives objects that three-dimensional look. It also makes scatter less obvious.
The challenge is to create a large light source which can also be placed
nearby.
The
diagram illustrates the effect of a small strobe or a strobe placed backward
too far. A small strobe behaves like a point source, creating harsh shapes
and shadows because the light cannot reach the sides. A large light source
as used to be common with bulb flashes, creates soft blending shadows and
gives objects that three-dimensional look. It also makes scatter less obvious.
The challenge is to create a large light source which can also be placed
nearby.